Before going to config the mail account,first we have to know the working of mail through the internet.And how the data is transferred (send and receive )between the user and the client.
POP3/IMAP- are the two different protocols used to access the mail service.
Mozilla thunder bird is a free open source platform for Email access. To configure the Mail account just follow the steps below,
First Step is to install the Thunderbird on your Computer by download the mail software in the Mozilla Thunder bird Site.Email clients, like Thunderbird, allow you to easily check your emails not going to web-interface. This post will help you to configure your Private Email account in Thunderbird.
Private Email service supports auto config feature, which allows to set up email account automatically in Thunderbird.
We will use a test email account xxxxxxxx.com in this post.
Open the thunder bird and choose Tools and than there below click Account Settings,

In the above window click account settings there we see an option Add mail account---> click
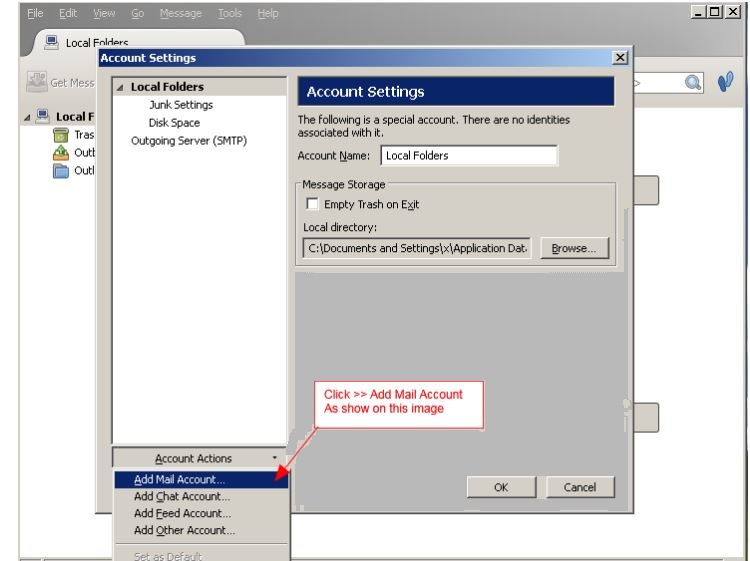
There we can create an new mail account with user name and password.
For automatic email account set up you need to do the following:
1.Go to File>New >Existing Mail Account
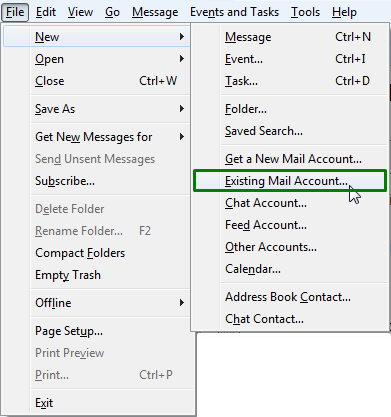
2.In mail account setup----(separate window enter the details)
your name          : xxxxxxxxx

E-Mail Address     : [email protected]

Password           :
3.After entering all the details just click continue in the window.

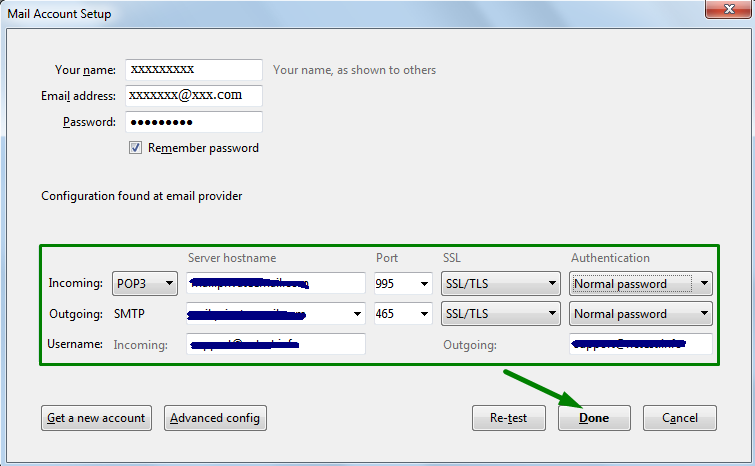
4. Now we will see the configuration window for email providing.
confirmed that your incoming and outgoing are properly configured and it detect at all.
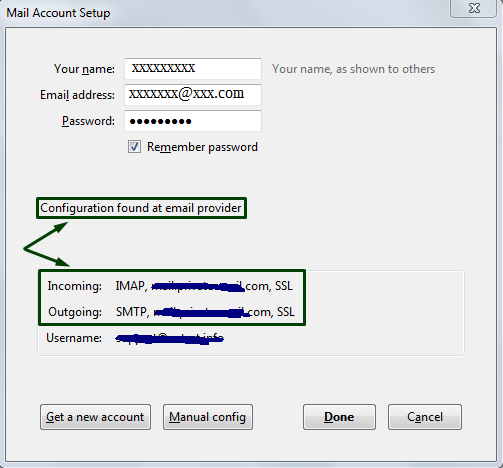
And than click done
If the configuration ,we configured above was not detected properly due to some reason, we can complete the first two steps manually and continue configuring Thunderbird.
1.In mail account setup window there is an option called Manual Config just click and continue..

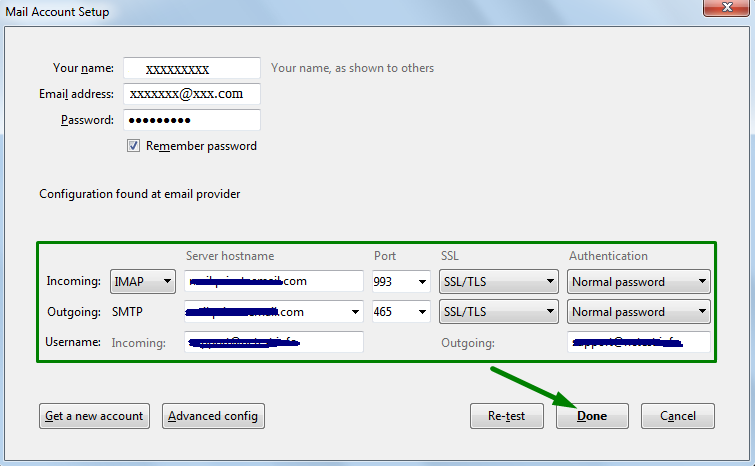
In the next screen, select POP3 or IMAP from the Account Type list, and enter your details as follows:
For IMAP protocol use the following settings:
Incoming and Outgoing server: xxxx.xxxxxxx.com
Protocol: IMAP Port: 993 SSL: SSL/TLS Authentication: Normal Password

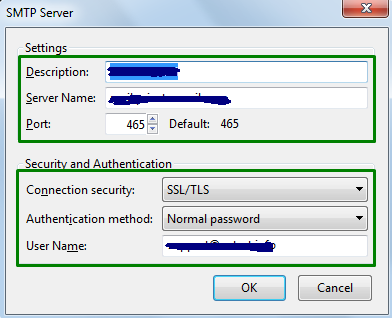
Protocol: SMTP Port: 465 SSL: SSL/TLS Authentication: Normal Password
For POP3 protocol use the following settings:
Incoming and Outgoing server: xxxx.xxxxxxx.com
Protocol: POP3 Port: 995 SSL: SSL/TLS Authentication: Normal Password

Protocol: SMTP Port: 465 SSL: SSL/TLS Authentication: Normal Password
Alternatively, we can use following settings for IMAP protocol:
Protocol: IMAP Port:143 SSL: None Authentication: Normal password

Protocol: SMTP Port: 587 SSL: None Authentication: Normal password
For POP3 protocol:
Protocol: POP3 Port: 110 SSL: None Authentication: Normal password

Protocol: SMTP Port: 587 SSL: None Authentication: Normal password
Advanced Settings
Once the account is created, we will be able to choose additional settings for IMAP or POP3 incoming/outgoing server.
Right-Click on your account in the list of accounts

To manage incoming server, go to Server Settings:

If we need to change settings for outgoing server, select Outgoing Server (SMTP):

In the above window we can find our current settings for the accounts that we have,there click to Edit to make changes in the next window
that's it.From the above post you can easily configure the mail account in thunder bird.

