Easy way to install Linux Malware Detect on CentOS 7
In this post, we will install Linux Malware Detect with ClamAV on CentOS 7.
Linux Malware Detect (LMD) is malware identifier and scanner for Linux, intended for shared facilitating situations. LMD is discharged under GNU GPLV2 permit, it very well may be introduced on cPanel WHM and Linux conditions with together other recognition devices, for example, ClamAV.
Clam AntiVirus (ClamAV) is an open source antivirus solution to detect trojans, malware, viruses and other malicious software. ClamAV supports multiple platforms including Linux, Windows, and MacOS.
In this tutorial, I will show you how to install Linux Malware Detect (LMD) with Clam AntiVirus (ClamAV). I will use CentOS 7 as the operating system.
Prerequisite
- CentOS 7
- Root privileges
system.
Prerequisite
- CentOS 7
- Root privileges
Step 1 – Install Epel repository and Mailx
Install the Epel (Extra Packages for Enterprise Linux) repository and the mailx command with yum. We need mailx installed on the system so that LMD can send the scan reports to your email address.
yum -y install epel-release
Install mailx so we can use the mail command on CentOS 7:clear
yum -y install mailx
Step 2 – Install Linux Malware Detect (LMD)
Linux Malware Detect is not available in CentOS or Epel repository, we need to install it manually from source.
Download LMD and extract it:
cd /tmp
wget http://www.rfxn.com/downloads/maldetect-current.tar.gz
tar -xzvf maldetect-current.tar.gz
Go to the maldetect directory and run the installer script ‘install.sh’ as root:
cd maldetect-1.6.3
./install.sh
Next, make a symlink to the maldet command in the /bin/ directory:
ln -s /usr/local/maldetect/maldet /bin/maldet
hash -r
[root@vpstestxxxx home]# cd maldetect-1.6.3/
[root@vpstestxxxx maldetect-1.6.3]# ./install.sh
Created symlink from /etc/systemd/system/multi-user.target.wants/maldet.service to /usr/lib/systemd/system/maldet.service.
Linux Malware Detect v1.6
(C) 2002-2018, R-fx Networks <[email protected]>
(C) 2018, Ryan MacDonald <[email protected]>
This program may be freely redistributed under the terms of the GNU GPL

installation completed to /usr/local/maldetect
config file: /usr/local/maldetect/conf.maldet
exec file: /usr/local/maldetect/maldet
exec link: /usr/local/sbin/maldet
exec link: /usr/local/sbin/lmd
cron.daily: /etc/cron.daily/maldet
maldet(7862): {sigup} performing signature update check...
maldet(7862): {sigup} local signature set is version 201809014081
maldet(7862): {sigup} new signature set 2018091610024 available
maldet(7862): {sigup} downloading https://cdn.rfxn.com/downloads/maldet-sigpack.tgz
maldet(7862): {sigup} downloading https://cdn.rfxn.com/downloads/maldet-cleanv2.tgz
maldet(7862): {sigup} verified md5sum of maldet-sigpack.tgz
maldet(7862): {sigup} unpacked and installed maldet-sigpack.tgz
maldet(7862): {sigup} verified md5sum of maldet-clean.tgz
maldet(7862): {sigup} unpacked and installed maldet-clean.tgz
maldet(7862): {sigup} signature set update completed
maldet(7862): {sigup} 15478 signatures (12667 MD5 | 2034 HEX | 777 YARA | 0 USER)
[root@vpstestxxxx maldetect-1.6.3]#
[root@vpstestxxxx maldetect-1.6.3]# ln -s /usr/local/maldetect/maldet /bin/maldet
[root@vpstestxxxx maldetect-1.6.3]# hash -r
Step 3 – Configure Linux Malware Detect (LMD)
LMD has benn installed into the ‘/usr/local/maldet/’ directory. Go to that directory and edit the configuration file ‘conf.maldet’
cd /usr/local/maldetect/
nano conf.maldet
Enable email alert by changing the value to ‘1‘ on line 16.
email_alert="1"
Type in your email address on line 21.
email_addr="[email protected]"
We will use the ClamAV clamscan binary as default scan engine because it provides a high-performance scan on large file sets. Change value to ‘1‘ on line 114.
scan_clamscan="1"
Enable scanning for root owned files. Set 1 to disable.
scan_ignore_root="0"
Next, enable quarantining to move malware to the quarantine automatically during the scan process. Change value to ‘1‘ on line 180.
quarantine_hits="1"
Change value to 1 on line 185 to enable clean based malware injections.
quarantine_clean="1"
Save and exit.
Step 4 – Install ClamAV
In this step, we will install Clam AntiVirus or ClamAV to get the best scanning results of LMD. ClamAV is available in the Epel repository (that we’ve installed in the first step).
Install ClamAV and ClamAV devel with yum:
yum -y install clamav clamav-devel
After ClamAV has been installed, update the ClamAV virus databases with the freshclam command:
freshclam
[root@vpstestxxxx maldetect]# freshclam
ClamAV update process started at Wed Sep 26 13:07:29 2018
Downloading main.cvd [100%]
main.cvd updated (version: 58, sigs: 4566249, f-level: 60, builder: sigmgr)
Downloading daily.cvd [100%]
daily.cvd updated (version: 24983, sigs: 2100133, f-level: 63, builder: raynman)
Downloading bytecode.cvd [100%]
bytecode.cvd updated (version: 327, sigs: 91, f-level: 63, builder: neo)
Database updated (6666473 signatures) from database.clamav.net (IP: 104.16.189.138)
[root@vpstestxxxx maldetect]#
Step 5 – Testing LMD and ClamAV
We will test an LMD manual scan with the maldet command. We will use the maldet command to scan the web directory ‘/var/www/html/’.
Go to the web root directory and download some sample malware (eicar) with wget:
cd /var/www/html
wget http://www.eicar.org/download/eicar.com.txt
wget http://www.eicar.org/download/eicar_com.zip
wget http://www.eicar.org/download/eicarcom2.zip
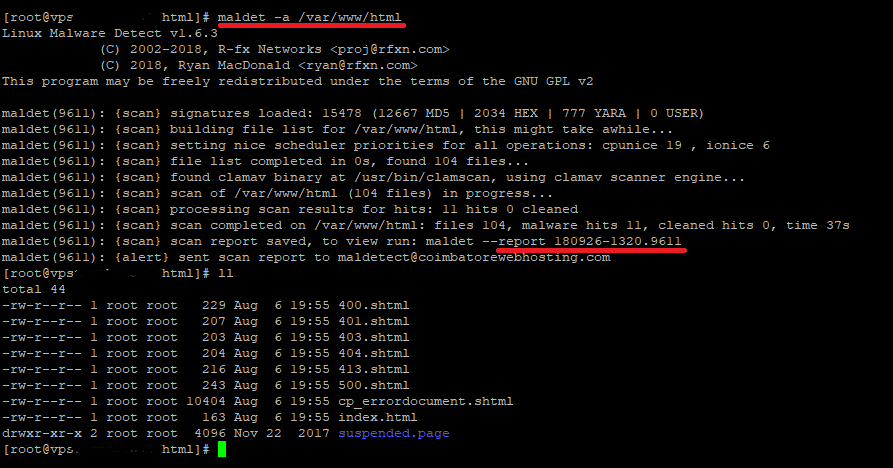
Next, scan the web root directory with the maldet command below:
maldet -a /var/www/html

You can see that LMD is using the ClamAV scanner engine to perform the scan, and there are ‘malware hits 3’ and the malware files were automatically moved to the quarantine directory.
Check the scan report with the command below:
maldet --report 180926-1320.9611
SCANID = 180926-1320.9611 is found in the Maldet output.
Conclusion
In this article we have discussed how to install and configure Linux Malware Detect, along with ClamAV, a powerful ally. With the help of these 2 tools, detecting malware should be a rather easy task.
If you satisfy with the above post feel free to share your comments.And to know about zabbix 3.4 click here.


